|
|
|
|
|
Jaguar XK8 Roof Troubleshooting 1997 - 2006
Jaguar XK8 Roof Operation
Trouble Shooting 101 Many of you have had trouble with your roof operation and had posted questions and asked for aid in finding the problems on the roof operation. I decided to put a little information together that should help. Should you come across anything I might have missed or something that should be added please let me know. This roof operation is dependent on the BPM and the SCM working properly and you also have micro switches, relays, pump, solenoids and hoses that are involved in the roof operation. The pump operates at 1600+/-psi and is bidirectional, meaning the motor turns in one direction for roof up operation and opposite direction for roof down operation, and is located in the trunk on the right side above the CD changer. Each operation is controlled by two relays, one for each direction located in the trunk fuse box. The roof lift and retract are done with two roof rams controlled by hydraulics, one on each side of the roof in the back between the roof and headliner. However, the ram on the right side is equipped with an internal up and down switch. The roof latch is located in the header above the center light control panel and is controlled by hydraulics and can only be seen when the cover has been removed. It also has three switches in the header, top ready to latch switch, top latch closed and top closed switch. Now I am going to attach a link to a TSB from Jaguar that will go into every detail of the roof operation that can be a little overwhelming but it will be a helpful tool when troubleshooting. Link to Jaguar TSB 501-11 http://www.jagrepair.com/images/TSB/XK8/501-11am.pdf The next link is to the electrical wiring diagram. Link to wiring diagrams select MY and go to Fig 15-2 http://www.jagrepair.com/JaguarXK8ElectricalOBDIIcodes.htm Now that you are overwhelmed with a lot of information I will try to simplify a few of the problems and causes of the roof operation. First let me talk about the hose failures. Hose failures are the most common problem with the hydraulics but ram seals should not be overlooked. Earlier MY cars have a more robust set of hoses installed and failures on them are not a common problem. You can identify those hoses by a code (see link below) that is printed on the hoses. The ram seals have been known to dislodge and will create leaks. With the hoses, pump pressure is the most common problem and also contributes to the ram seals failing but the lack of lubrication on the ram shafts will also add to the ram seals becoming dislodged. This next link will cover what I have found when investigating the hydraulic failures on the XK8. Link to http://www.jagrepair.com/HydSystemEvaluationXK8XKR.htm The most common problem is the hose failures and make no mistake that replacing the hoses is not a quick and easy job to do. I am attaching a link on my first roof latch hose replacement. Many others have done this job but my procedure was done many years ago and took me around 8 hours to do in my driveway. Just remember that the hoses are directional and MUST be attached properly so I would recommend that you replace each hose, one set at a time. I had noticed that TopHydraulics.com, who sells replacement hoses, marks each hose on each end to prevent crossing them up. Link to latch hose replacement http://www.jagrepair.com/RoofHoseReplacement.htm Link to hose placement on pump http://www.jagrepair.com/HydraulicHoseConnections.htm I have done both roof rams and hoses but have not done a procedure yet. Replacing them is straight forward but you only need to remove the rear seat and speakers to have access to them both. I will try to make a procedure and post it. Electrical sequence and operation: With the many questions I have been asked on the roof operation I needed a test box to help others in troubleshooting the roof operation. My first attempt was only for the pump motor operation and the two valves on top of the pump that are for the latch and roof lift rams. The second test box was manufactured for me by www.thejagwrangler.com showing the full operation of the roof operation and sequence. Link to electrical operation of roof operation. http://www.jagrepair.com/JaguarXK8RoofOperationalTestBox.htm I hope you took the time to see all the stuff that is involved with the roof operation. At this point I will try to cover a few things you can look for if you are experiencing roof operation failures.
Roof is stalling when opening
and closing. The most
common problem is that the hydraulic fluid is low, the petcock is loose
or the rams need to be lubricated.
Filling pump http://www.jagrepair.com/HydraulicPumpRefill.htm Petcock is the “T” handle mounted on the side of the pump. Turn the petcock counter clockwise to open and turn clockwise to close. Lubrication of the ram shafts can be done by spraying WD40 on a rag and rub it on the ram shaft and this can be done when the roof is in the closed position.
The roof goes up to the latch
but the latch does not grab the roof and close or the latch opens and
the roof will not pull back to open.
First check the fluid level and the petcock closed. Remember I said that the roof system has several switches and you need to check the one in the center of the header first. This switch if stuck down will tell the computer that the roof is already closed or the latch is still closed and cause the pump to shut down. The other switch is located in the right ram and testing it is a little more difficult to do because of the location. You can track the lead to the trunk and test the switch at that location. Link to roof header http://www.jagrepair.com/RoofLatchRepair1999xk8.htm
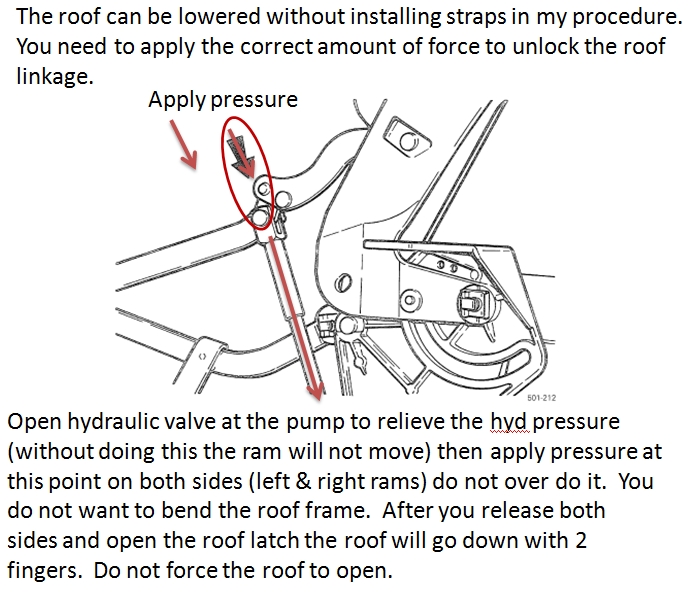
Opening the roof manually when
you are unable to use the hydraulic system to do so. First open the petcock at the pump (“T” handle counter clockwise) then take the allen wrench that should be mounted on the shelf that the pump is mounted on. If you do not have one you need to find an 8mm allen wrench. Sitting in the right seat raise your left hand to the header and you will see a plastic plug in the face of the header. Pull that plug and insert the allen wrench and rotate to unlatch the roof. Once the roof is unlatched you will need to unlock the roof rams. To do this you will need to reach behind the headliner behind the rear seat on the left and right and unlock the rams and lift the roof open with a few fingers. If you are unable, recheck that the rams are unlocked and try again but do not force it open. See the attached illustration. See note on closing the roof manually below. Link to unlock the roof rams http://www.jagrepair.com/images/AutoRepairPhotos/Roof%20Rams.jpg
Closing the roof manually when
you are unable to use the hydraulic system to do this. A failed hose or malfunction roof operation would prevent you from operating your roof when you least expect it so know how to operate it manually. If the roof is open and you need to close it, try the following steps. Open the petcock (“T” handle counter clockwise and open the latch using the allen wrench that should be mounted on the shelf of the pump). Sitting in the right seat raise your left hand to the header and you will see a plastic plug in the face of the header. Pull that plug and insert the allen wrench and rotate to unlatch (open) the roof latch. Pull the roof up to the latch then close the latch with the allen wrench. Once the roof is up and latched you will need to lock the rams for the rear quarter windows to close. The attached illustration of the ram linkage shows how to unlock them. You just need to push it in the opposite direction to lock them in place. Note it is not an easy job to lock them but it can be done by pushing up on the lower linkage. Link to unlock the roof rams http://www.jagrepair.com/images/AutoRepairPhotos/Roof%20Rams.jpg If you are unable to close the windows you can jump
out the window relays to close them but know what you are doing.
I do not recommend closing the windows on a roof that is not
locked because when driving the roof would be free to bounce on the
windows and cause damage to the windows and linkage.
Roof hydraulic lines leaking The hydraulic system is push/push system that means that two hydraulic lines are attached to both lift rams and the roof latch ram so when you operate the roof manually additional fluid can and in most situations will seep out. So have a clean dry rag in the car for any leakage that might take place.
Identify a hydraulic leak More often than not the hose failures are at the latch area then at the pump and last the roof lift rams. A slow leak could be caused by a hose connector beginning to fail or a ram shaft seal that has been dislodged all due to high pressure. When you see a green fluid in the header light or in the rear tire wheel well (it would be a moist area forward of the tire) it is a sign of a leak. Another area is in the trunk at the pump. Know that the two hoses on the pump you see mounted are for the roof latch and the four hoses behind the pump closest to the fender are for the roof lift rams and you could see fluid on the shelf indicating a leak. Know that at times if the fluid in the tank of pump might go a little low it could be a sign of a leak.
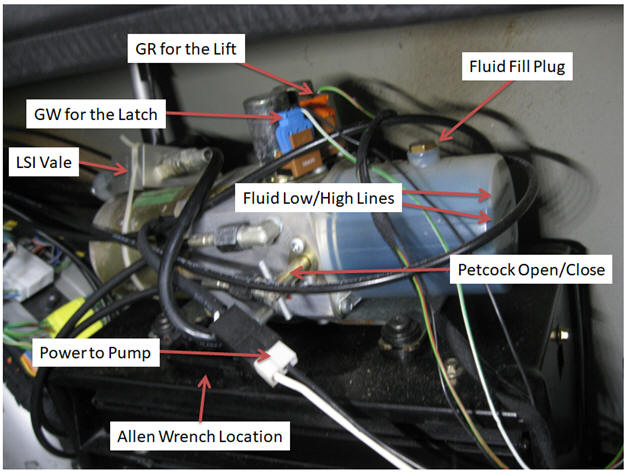
Now I want to cover a few of
the things that make the roof system work and what they do. The roof hydraulic pump is located in the trunk of your xk8 on top of the CD changer and your audio amplifier. The pump is equipped with the hydraulic reservoir, two solenoids one to operate the roof latch and the other for the roof lift.
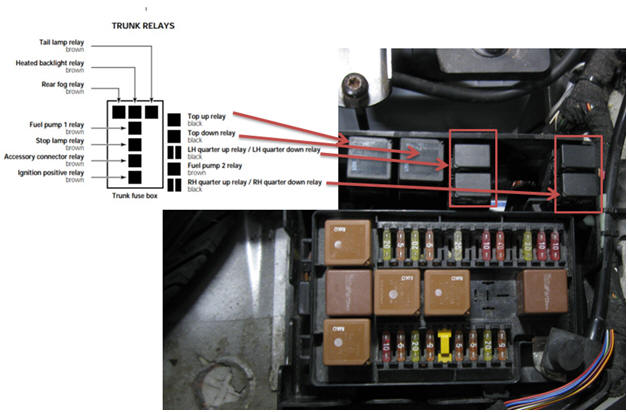
The pump is bidirectional and is controlled by the up and down button in the car to the up down relays in the trunk. You have only 2 wires to the pump but depending on your selection the power and ground alternate between the white and black wires to the pump. The petcock has an open and close function. With the valve closed (clockwise) it will enable the operation of the roof under its own power with the valve open (counter clockwise) the roof operation is fully manual and the pump will not operate the roof. The fill plug is mounted on the top of the reservoir. It is not necessary to have the roof in any position, open or close. It makes no difference when filling. The reservoir has two embossed lines on the end of the tank. If the fluid is at or near the bottom line, refill to the top line. Mounted on the top of the pump are 2 solenoids, one is for the roof latch operation and the other is for the roof lift operation. Please note that the operation of these valves and the pump operation are controlled by the security control module. NOTE: removing the plug from the solenoids is not an easy task and they are brittle. If you break one you will hate me then yourself. My advice is to leave them alone and do not tug on the wire to them or the plug. In a few cars you will see an additional plug for both solenoids on the side of the pump rack that is a safer disconnection. In the photo you can see the LSI pressure relief valve I have mounted on my pump. I will provide a link to the LSI valve info and how to install. Link http://www.jagrepair.com/HydPressureReliefValve.htm Relays for the roof and rear quarter windows are located in the trunk fuse box. Under that fuse box is the security module.
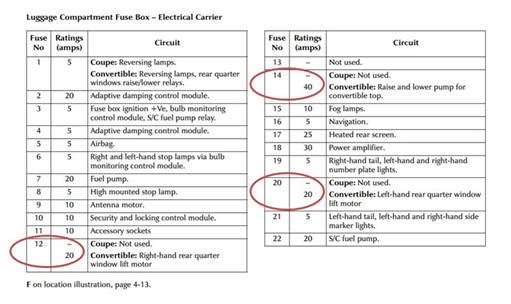
Fuses for the roof and rear quarter windows.
The information listed below I copied from the TSB 501-11. You will find a link to it in this write up but I wanted to point out the function of the relays and how important they are in the operation of the roof.
Just remember that your roof system is dependent on the pump, solenoids, switches, body processor, security module and battery being in good working order. To be continued!
|
|
|

