|
|
|
|
|
Poor Idle Intake Manifold Vacuum LeakSeveral months ago, after I got my transmission shifting problem fixed, I noticed that my car was idling poorly and it was getting progressively worst so I began my quest to fix the problem. I first thought it was the plugs because they had been in the car for several thousand miles. I pulled the old plugs and found that they did not appear to be the problem but changed them anyway. Wel,l it did not fix the problem so I cleaned the MAFS and started to check for vacuum leaks and found one. Using TB cleaner I could spray around bank 2 cylinder 1 (left front) and the reaction was clear that I had a leak but had no codes. I could not identify the exact location of the leak but at the time I thought it was the engine breather hose going to the breather stub. I replaced the hose and still had a leak. I should have removed the hose and tested it with air pressure but I did not and that was ok. Moving on, I knew that I had one of three things going on, a bad head gasket, bad intake manifold gasket or a cracked intake manifold. I pulled the intake manifold and replaced all the manifold gaskets and examined the intake for cracks and the head for leaks, none found. Reinstalled the intake manifold, NO JOY! I took the car into a local shop who had a smoke tester and we found the problem, I had a cracked intake manifold! So, I ordered a used intake manifold and had to wait for the second one to come in because the first one was not going to work. I examined the second used manifold by washing it with Simple Green, cleaned it up and reexamined it and found it to be good so I began transferring all the stuff. Got it on the car and the idle problem improved but was not corrected. Took it back for another leak test (smoke) and found a slight leak under the TB where the throttle elbow hose connects. This was after the pressure was increased a little. I am getting an “O” ring that should take care of the leak. I fixed all the leaks and I can say at this point NO VACUUM LEAKS! Took it out for a run all was good until I pushed it for all it had and I got the codes I needed. I should note that the poor idle still existed. The codes I got were P0300, P1316 and P1121 ABS Traction control, Transmission trouble and Failsafe cleared the codes and drove it home with no problems. I removed the throttle body when I got home and to my surprise I saw the throttle position sensor case had seemed to come apart. I should mention that I did perform a MAFS test to see what readings I was getting to give me direction after the leaks were corrected but instead I went directly to the throttle body and sent it out for checks and repairs if necessary. This was my process to fix the problem
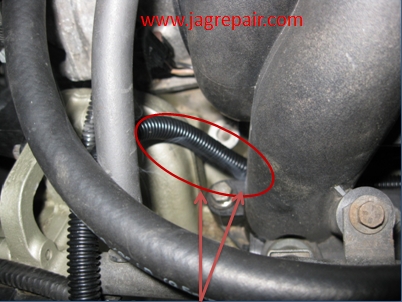
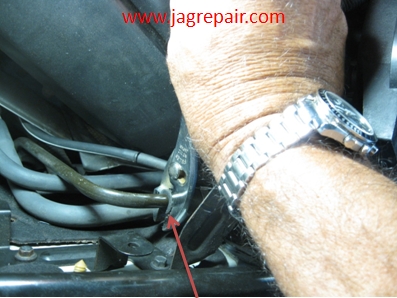
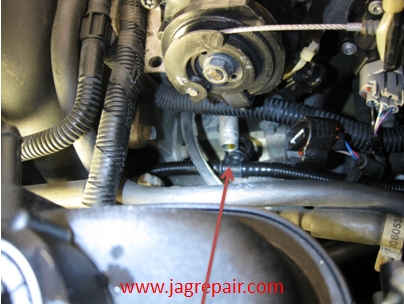
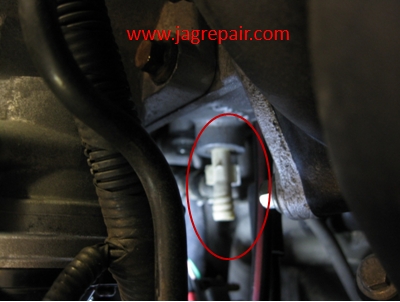
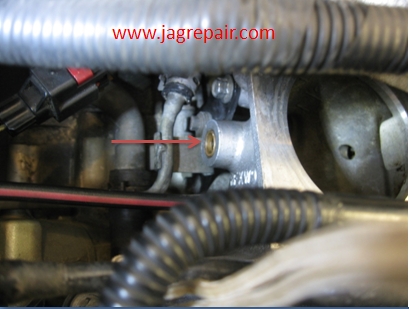
I am jumping ahead to show you the location of the leak we found using a smoke test. In the beginning I found area using throttle body cleaner but was unable to pinpoint the problem but felt it was the breather hose under the manifold so, I elected to replace the breather hose.
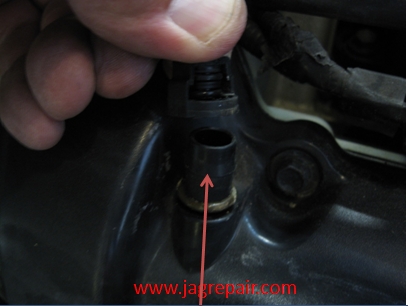
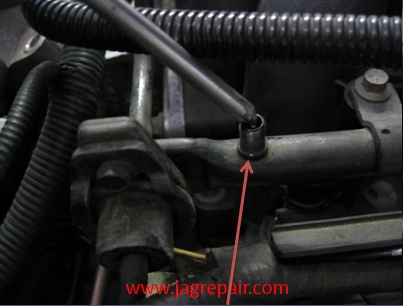
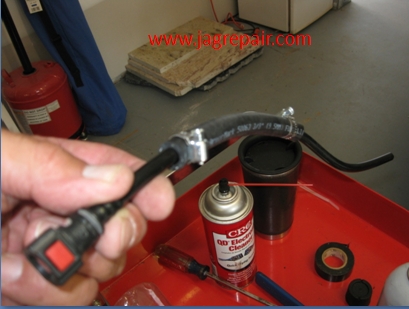
Removed the breather hose from the breather stub.
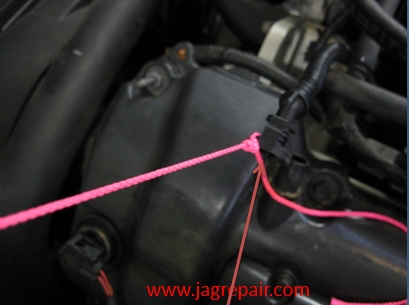
Tied a string to one end so when I pull it out from under the manifold I could pull the new hose in.
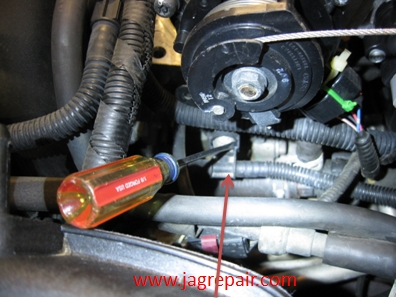
I could not get my hands on the connector so I used a screwdriver to unlatch the hose. If you do this be sure to not apply excessive force breaking the stay clip on the hose.
This is the other end of the breather hose and it is located under the coolant tank.
I put a string on the other end to help pull the hose out and it came out with little to no effort. I then pulled the new hose in and connected all 3 points and still no joy. I examined the old hose but it did not have any leaks. At that point I knew I needed to do a better job troubleshooting. I pulled the intake manifold and examined it along with the head gasket for leaks and could not see any abnormalities. At that point I replaced all the intake gaskets and retorqued the intake manifold.
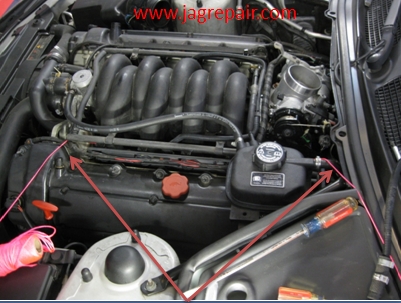
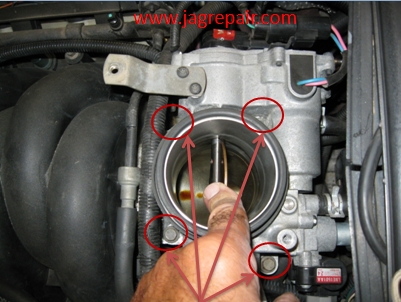
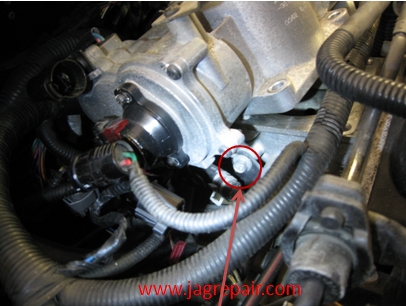
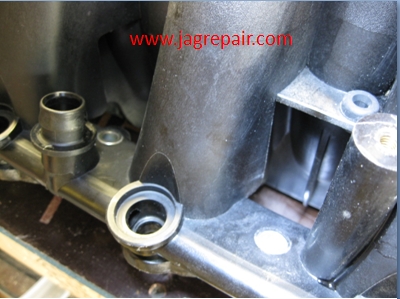
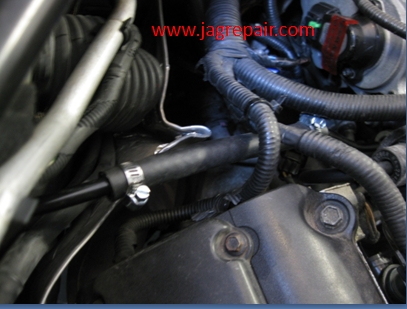
Removed the 4 bolts holding the throttle body. I did not remove the throttle body from the car. What I did do was tie it up to the wiper shroud to keep it out of the way.
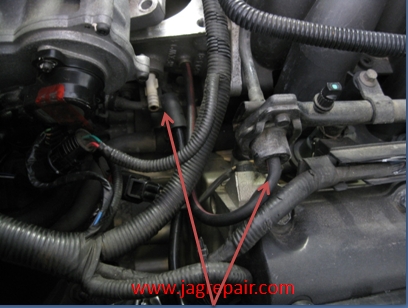
Under the throttle body you have 2 bolts one on each side that must be removed before the intake manifold can be removed. See photo above and below.
I released the fuel pressure at the Schrader valve.
Released both fuel lines to the injector rails. This is the first on top.
Released both fuel lines to the injector rails. This is the second on the left side.
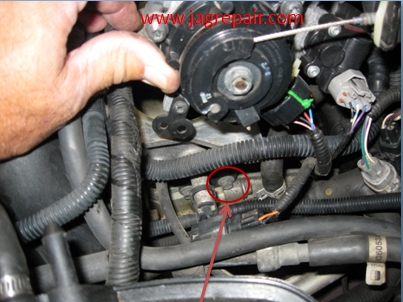
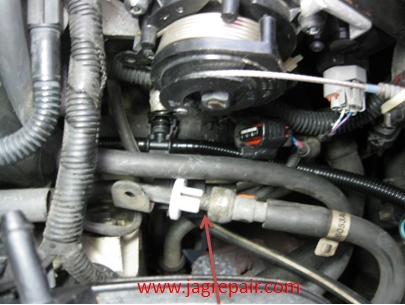
Remove the vacuum line under the throttle body left side.
This is the second vacuum line on the left side. Disconnect it.
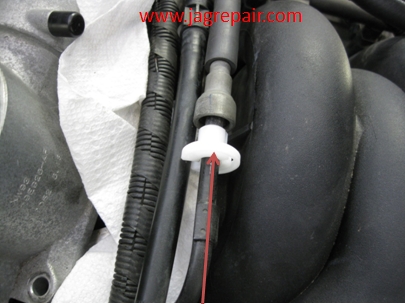
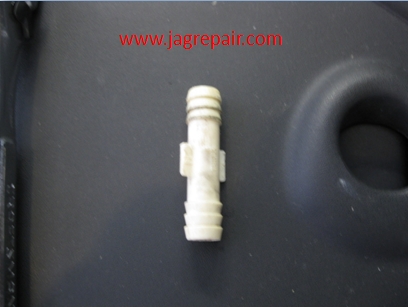
On the right side you have 2 lines to disconnect, one to the fuel rail and the other under the throttle body. Please note the white plastic connector tube. It is not the correct connector and does not belong and I did not notice it.
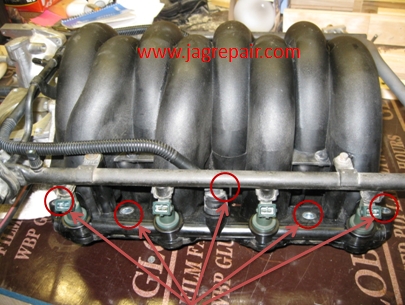
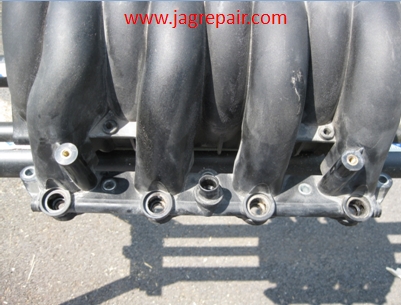
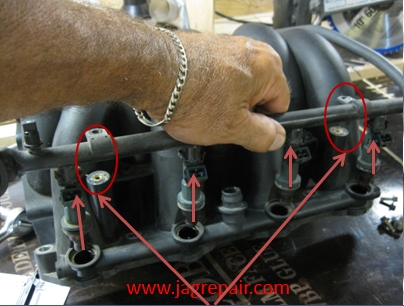
I failed to take a photo of the manifold with the bolt location when it was in the car but the above photo provides the 5 bolt locations for one side, the other side is the same.
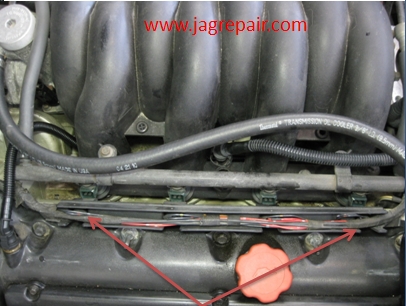
Remove the clips (4 on each side) that hold the power supply rail to the injectors.
Once all the clips are removed you can unplug from the injectors. At this point you can remove the intake manifold. You may need to do a little jiggling to get it out but no big deal.
The new intake manifold gaskets. Notice how clean the injector was.
This gasket was an option but thought it would be best to replace it now that it was out. This is where the throttle body housing bolts onto the intake manifold.
The gasket set for the intake manifold. At this point I did examine the intake manifold for any indication of a crack or a bad gasket but was unable to identify any problems. At this point I felt all was good so I reinstalled the manifold and put it all back together. Started it up and took it out for a run and ran it HARD. I got a P0171 & P0174. I then took the car to the shop and did a smoke test on it and could see that the intake manifold had a crack so I ordered a used manifold. I got the used manifold and elected to clean it before installing it and check it the best I could before installing it. I cleaned it with Simple Green and blew out all the ports verifying all was good.
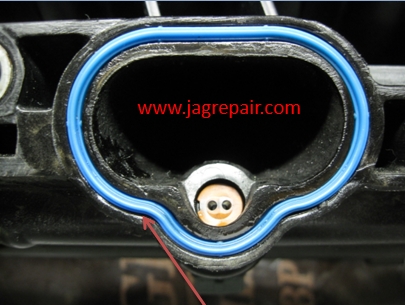
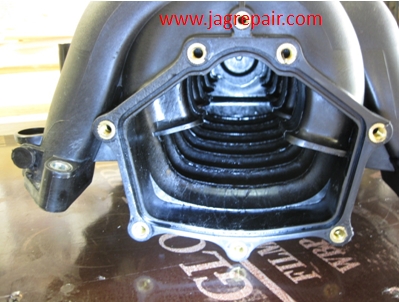
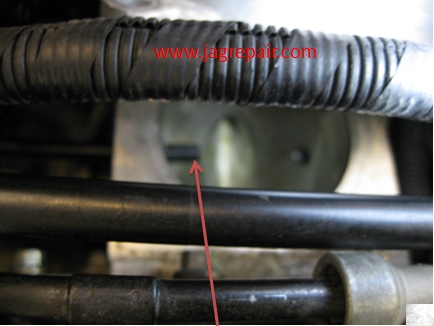
This is the leak and it appeared to go up that port for about 2 to 3 inches. Time to remove and get another one installed.
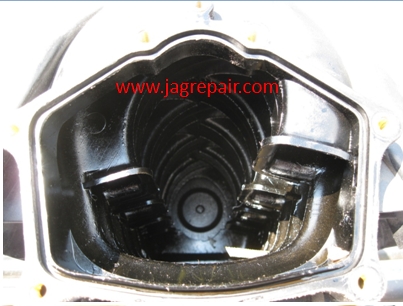
New to me (used) manifold before cleaning.
Before cleaning.
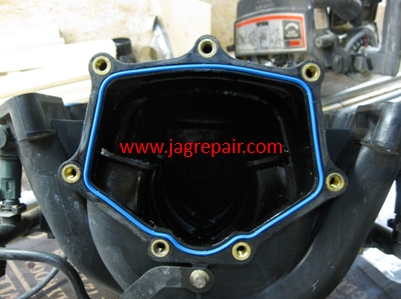
After cleaning.
After Cleaning.
After cleaning the replacement manifold I removed the injectors from the old manifold by removing the 2 bolts and lifting the entire one side from the manifold and then did the same on the other side.
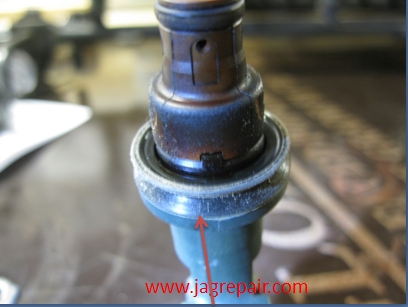
I then removed the injector seals and cleaned them all and lubricated the seal and “O” ring at the injector end and lubricated the injector port for ease of install into the new manifold. After I was satisfied all was seated properly I installed the bolts. I did reuse the manifold gaskets on the new manifold. They are channel gaskets and did not think they had time to develop memory. I installed the new manifold and did another smoke test. Now you remember that white plastic vacuum connector under the throttle body, well It began leaking so I attempted to find out why but my problem was I could not find it in a parts list. Well with help from a friend I found out it is not a standard part. I have no idea how it got there but it was coming out and I was going to make it right.
I guess after moving things around I might have dislodged this connector causing it to leak. I am glad it did because it was not right.
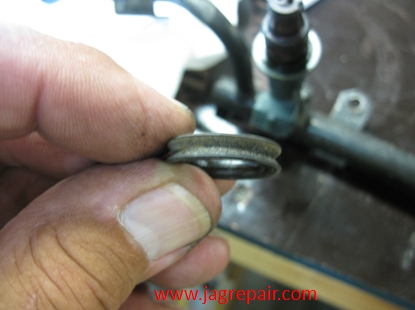
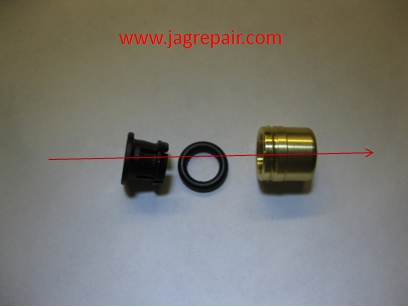
This is the connector removed.
This is the real pipe I found inside and good thing it was just shoved into place from the inside.
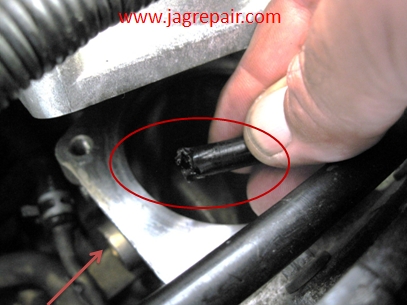
This is where the hose enters under the TB but it was missing parts.
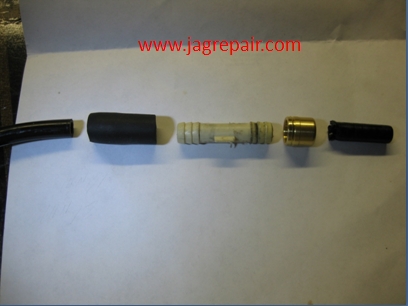
This is the sequence of the parts that I removed.
These are the correct parts to hold the vacuum hose.
I found that this hose was not available so I elected to make it work and in order to do that I had to cut the hose and splice a rubber hose in the middle to extend it to its proper length.
The end results.
And it worked.
Made it about ¾ to 1 inch inside the TB housing.
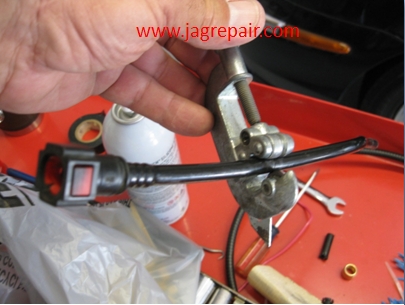
This is the throttle body on the bottom side of the TPS. It is now in for testing and repairs at ASI. The codes I got were P0300 Random misfire P1316 Misfire excess emissions P1121 PPS circuit range / performance Transmission trouble ABS/Traction control failure Failsafe. Replacing the Purge Valve pulled my fuel trims back in line and resolved my poor idle issue. This is a link to the Purge Valve replacement Purge Valve Replacement
|
|
|